Tuesday, 17 February 2015

Cache transactions to clear the Cache for SAP FIORI

Here are list of transactions and programs to clear the cache for SAP FIORI applications.

1.Clear the server http cache

Go to the transaction SMICM. Goto -> HTTP plugin -> Server cache -> Invalidate Locally and Globally.

2. Clear metadata cache
Transaction: /IWFND/CACHE_CLEANUP on Gateway
Transaction: /IWBEP/CACHE_CLEANUP on Backend and Gateway

3. Synchronize chip cache

Run the report /UI2/CHIP_SYNCHRONIZE_CACHE. Make sure there is no error in the table /UI2/CHIP_CHDR
Run the report /UI2/DELETE_CACHE_AFTER_IMP.
/UI2/DELETE_CACHE

4. Run cache buster

Run the report /UI5/UPDATE_CACHEBUSTER.

5. Clear local browser cache

Tuesday, 12 November 2013

Log reduction in SQL server


Hi All,

For Reduce the Log file in SQL server to specify size.

SELECT name, log_reuse_wait_desc FROM sys.databases where name='System ID';


EXEC sp_removedbreplication 'System ID';


SELECT name, log_reuse_wait_desc FROM sys.databases where name='System ID';


ALTER DATABASE System ID SET RECOVERY SIMPLE;


DBCC SHRINKFILE ('System IDLOG1', 1000, TRUNCATEONLY);


Thursday, 7 November 2013

Error in Run ABAP Import reports (SAP installation)


Error in SAP System: Problem at Run ABAP Import reports:
An error occurred while processing option Enhancement Package 7 for SAP ERP 6.0 > SAP Application Server ABAP > MS SQL Server > Central System > Central System( Last error reported by the step :Unable to open RFC connection.). You can now:
Choose Retry to repeat the current step.
Choose Log Files to get more information about the error.
Stop the option and continue with it later.
Log files are written to C:\Program Files/sapinst_instdir/ERPEhP5/AS-ABAP/MSS/CENTRAL/.
An error occurred while processing option Enhancement Package 5 for SAP ERP 6.0 > SAP Application Server ABAP > MS SQL Server > Central System > Central System( Last error reported by the step :Unable to call function. Error message: Exception condition "WRITE_FAILED" raised. .). You can now:


Solution:
1. Ist We have to Give the Permissions in Users,Administrator and SSD ADM.
2. Host File Adding in Drivers:
                   IP Name                        Host name                       SAPTRANSHOST
3.Add this parameter - login/no_automatic_user_sapstar-0 in default profile
4. Restart the MMC and start the Services in Services.msc.
First ensure that there is no DNS server address configured in your Network configuration. Then add the following line to your \winnt\system32\drivers\etc\hosts file or correct an existing line accordingly
<IP Address of server> <Hostname> SAPTRANSHOST
Once done, check as below dir \\SAPTRANSHOST\sapmnt\trans
Check that the user SAPService<SID> has write permission on the transport directory.
Then restart SAP through SAPMMC and also restart Service SAP<SID>
Then continue the installation.
Also carefully go throuogh below SAP Note..

[Note 162266 - Questions and tips for R3SETUP on Windows NT / W2K|https://service.sap.com/sap/support/notes/162266

Tuesday, 5 November 2013

SAP Router commands (IMPORTANT)

SAP Router commands:
saprouter -s Stops SAProuter
saprouter –r Starts SAProuter
niping -c -O -S 3299 -H 194.39.131.34
niping -c -O -S 3200 -H (Your Server ip) ---> port is open in SAP router is not
niping -c -O -S 3201 -H (Your Server ip) ---> port is open in SAP router is not
Verifying the Configuration
sapgenpse get_my_name -V -n issuer
saprouter –I - status connecting properly
Importing the Certificate & Creating Credential
sapgenpse import_own_cert -c srcert -p local.pse
Creating the credential for User responsible to start SAP Router
sapgenpse seclogin –p local.pse –O <sidadm>
Name of the Issuer as : CN=SAProuter CA, OU=SAProuter, O=SAP, C=D
Post Configuration Activity
Set environmental variable SNC_LIB=/usr/sap/saprouter/ libsapcrypto.so
The command saprouter -n (iSeries: saprouter '-n' ) is used to report changes in the route permission table to the running SAProuter.


Wednesday, 28 August 2013

Background Jobs to Be Scheduled Regularly

Background Jobs to Be Scheduled Regularly 
There are a range of background jobs that must run regularly in a production system, to, for example, delete obsolete jobs or spool objects. You should schedule the following jobs periodically in the job definition transaction SM36, so that they are automatically started at the specified frequency:
Program Name / Job Name
Repetition Frequency
Description
RSBTCDEL2 /
SAP_REORG_JOBS

Daily
Deletes old background jobs
RSBDCREO /
SAP_REORG_BATCHINPUT
Daily
Deletes old batch input folders
RSSNAPDL /
SAP_REORG_ABAPDUMPS

Daily
Deletes old ABAP dumps
RSBPSTDE /
SAP_REORG_JOBSTATISTIC

Monthly
Deletes old job statistics
RSBPCOLL /
SAP_COLLECTOR_FOR_JOBSTATISTIC

Daily
Creates job statistics
RSCOLL00 /
SAP_COLLECTOR_FOR_PERFMONITOR

Hourly
Starts data collectors for ABAP statistics records
RSN3_STAT_COLLECTOR/
SAP_COLLECTOR_FOR_NONE_R3_STAT
Hourly
Starts data collectors for non-ABAP statistics records (Distributed Statistics Records, DSRs)
RSXMILOGREORG /
SAP_REORG_XMILOG

weekly
Deletes obsolete entries in the XMI log
RSAL_BATCH_TOOL_DISPATCHING/
SAP_CCMS_MONI_BATCH_DP

Hourly
Starts long-running data collectors that report application-specific values to the monitoring architecture
RSPO0041/1041
SAP_REORG_SPOOL

Daily
Deletes obsolete spool requests to reduce system load
RSPO1043

Daily
Checks the consistency of the spooler and of the TemSe and evaluates the results if necessary
RSBTCPRIDEL/
SAP_REORG_PRIPARAMS

Monthly
Reorganizes the print parameters across clients

Friday, 23 August 2013

Enable Multiple RDP sessions via the registry

Enable Multiple RDP sessions via the registry

1. Start > in the search/run box type regedit {enter} > Navigate to:
HKEY_LOCAL_MACHINE\SYSTEM\CurrentControlSet\Control\Terminal Server

Locate the fSingleSessionPerUser value > Set it to 0 (Multiple sessions allowed), or 1 (Multiple sessions NOT allowed).
multiple rdp

Monday, 12 August 2013

Local Client Copy

You have created a new SAP client and want to copy data from other client.
You do local SAP client copy for the following:
- to fill initial data (usually copy from 000)
- to do SAP System refresh (in your QA)

1. Login to your newly created/empty client as SAP* and Go to Tools -> Administration -> Administration -> Client Administration -> Local Copy or Directly Go to transaction SCCL.

SAP Local Client Copy
 2. Choose the copy profile

Profile for SAP Local Client Copy
Profile for SAP Client Copy
 3. Use Parallel Processing to speed up the process.

Use Parallel Processing for Client Copy
Use Parallel Processing
 4. Enter the Parallel Processing Group

RFC Group for Parallel Processing
RFC Group
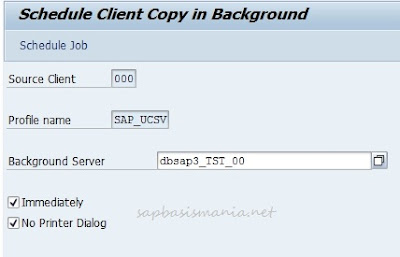
 5. You can schedule in background or start immediately

Background server for Client Copy
 6. Choose Background Server and click immediately

Choosing Background Server for SAP Client Copy
Choosing Background Server for Client Copy
 7. Background Job scheduled

Choose Background Server for Client Copy
Scheduling Client Copy
 8. Summary of your SAP Client Copy

Summary of SAP Client Copy
Summary of your SAP Client Copy
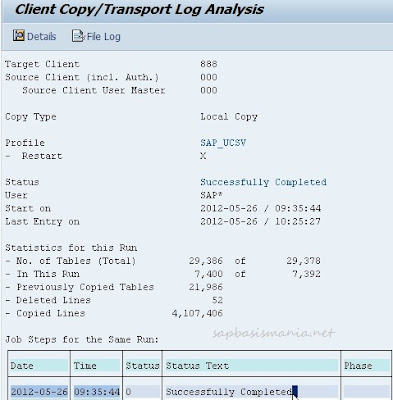
 9. SAP Client Copy is being processed and you can see the log from SCC3.

Log of Client Copy
10. Double click to see the progress.

Progress of SAP Client Copy
11. Make sure your client copy is successfully completed .

SAP Client copy successfully completed